August 11, 2011

Crafting Updates

I haven't had too much time to do crafting and sewing lately.  I was just hired on as a substitute teacher in four school districts for the upcoming year!  So my mind has been there...

I had my first wedding dress alteration earlier this week!  Nothing too spectacular and it took all of 15 minutes, if that.  But I cannot give you any clues into the dress, as I am keeping that a secret…  You’ll just have to wait it out like me!

I have been in crazy crafting mode lately.  I’m sure you could tell from all of my blog posts.  I started making candles, which I had never done before.  I’ve never been big into candles, so I don’t think that it is going to become an all the time thing, but it’s fun to experiment.  I found a way to make your own candle holders too, so when I get a chance to try that out I’ll let everyone know how it goes.  My current idea is to make some candle holders, wrap them in lace for a nice vintage feel, and put a candle in it.  This would cost me nearly nothing to make since I already have so much random crafting stuff around the apartment.

I started on a chalkboard globe a few weeks ago, but I'm still trying to find the paint for it.  I found a way to make your own, so I may end up doing that instead.  I just need to get some non-sanded grout... I'm guessing at a hardware store?
Anyone else have any ideas of what my next project should be?

August 9, 2011

Bottle Cap Candles


In continuation of yesterday’s theme, here’s another gift that will be heading out to someone.  Bottle Cap Candles!  I’m guessing you were able to deduce that by the title of this post.


I even made my own candles, that was an interesting thing to do as it was the first time I had ever tried it. I did make the mistake of using a plastic spoon to stir the hot wax.  I'm not sure why I thought that would be a good idea...


It doesn’t look like they will be able to burn for too long, but they are just so cute!


August 8, 2011

Sewing Themed Candle Holders

I’ve been in a gift giving mood lately.  Lots of big events going on.  Today’s gift is a set of sewing themed candle holders. 


I took a vintage sewing pattern and wrapped it around a votive candle holder.  A pretty easy project all around, but it looks fantastic.  


How cool is that!  I might start taking orders for these!  And one of you lucky people might be the recipient of a set of these… aren’t you just dying to find out if it is you?

August 5, 2011

Rainbow in a Jar!

I first saw a photo of this on Foodgawker.com and though it was one of the coolest things ever.  I have a friend who loves everything rainbow (hence the rainbow corset from an earlier post…) so it immediately went into my personal cookbook.  It is now a few months later and I still haven’t been able to find a reason to break out the recipe. 

It’s a really easy recipe.  I just bought some store white cake mix.  In case you didn’t know this, I can’t make store bought cakes.  They always fall apart on me.  But I thought since this doesn’t have to come out of the pan I should be fine.  I also was on a limited time constraint as I wanted to finish quickly.

After making the batter, I tinted each section with food coloring and layered them into the mason jars.  I only filled them about ½ full so they could rise and still have room for frosting.


Here they are ready to cook…


And the end product! 


I made frosting from scratch though and tossed some sprinkles on it. 


I then packed up a few jars to send out in the mail to a really great friend of mine who is going through some tough times.  Hopefully they will find her well and still intact! 

August 4, 2011

Refashion Help

I have a black, floor length, a-line, satin skirt that I was supposed to wear as a bridesmaid but never got the chance to.  So it’s been sitting in my closet for the past 4 years with the tags still on it.  I’ve always said that I was going to refashion it into something wearable, but I haven’t gotten around to it.  There’s enough fabric to make a dress out of it!  And it comes with a hot pink satin tube top, though I don’t think I’ll be using that anytime soon… maybe I’ll take out the boning and use that again.

Anyone have any pattern ideas on what could do with it?  Nothing pops out in my head so I thought I'd turn to everyone on here to give me some ideas.

August 2, 2011

Zoey, Our Flower Girl/Ring Bearer


Zoey, as long as the weather cooperates, is going to be in our wedding.  I didn’t want to have her wearing one of those weird dresses for dogs because they just look uncomfortable and unnatural. 


I planned on making her some flowers to wear out of the same fabric that the bridesmaids dresses are.  While I was at the fabric store, I saw some really nice deep orange fabric that was the same material as the bridesmaids’ dresses.  I bought 1/3 of a yard of it to make her a little corsage to wear.  It’s really easy to do and they look fantastic. 


How to Make Fabric Flowers:

1. Cut your material into ovals the size that you would like your petals to be.


2. Heat the edges over a flame, such as a tea candle.  Make sure to not allow it to catch on fire.  The edges will turn black and curl a bit.


3. Sew the petals together to make a flower.  


4.  Add beads to the center of the flower.  I used pearls and rhinestone beads.

5. Sew the flowers together to make a bouquet.


August 1, 2011

Sewing Challege: Western

At first when I heard the theme was Western, I was at a loss.  My fiancĂ© loves westerns, but I don’t nearly love them as much.  Then I realized one of my favorite shows was a Western! 

This is for my fiancĂ© .  He goes crazy when he just rides one of the buses with ads on them for Montana...


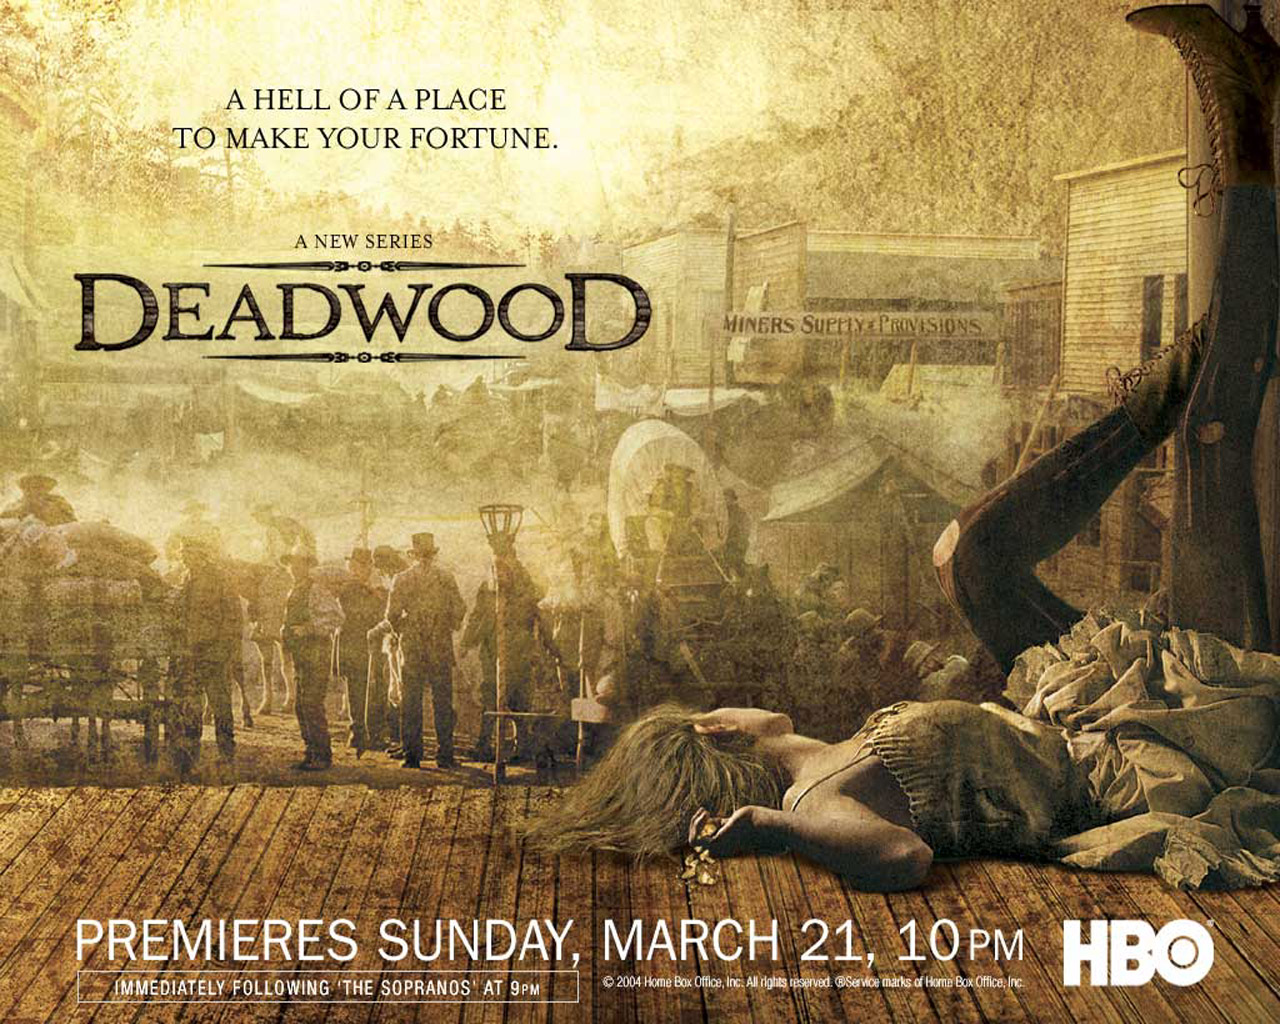
Deadwood, for those who haven’t seen it, was a tv show on HBO from 2004-2006.  It was set in the 1870s in Deadwood, South Dakota.  The show had lots of fantastic actors, an amazing script and set, and really good looking costumes.  The show combined true characters and events with fictional elements.  Though using the female characters for inspiration limited me to prostitutes, drunks, and one widow. 


Wild Bill Hickok: You know the sound of thunder, Mrs. Garret?
Alma Garret: Of course.
Wild Bill Hickok: Can you imagine that sound if I asked you to?
Alma Garret: Yes, I can, Mr. Hickok.
Wild Bill Hickok: Your husband and me had this talk, and I told him to head home to avoid a dark result. But I didn't say it in thunder. Ma'am, listen to the thunder.

While I love Trixie, I didn’t want to have to go out and buy a bunch of supplies to make a corset… though I could have made some fantastic striped stockings…


I thought it would be fun to branch out from my usual sewing and try my hand at a hat.  I don’t really have much use for a hat, but I’ve always loved the hats that Joanie wears.  After looking at some photos, I guess it's just one hat, but it's so much fun.


Joanie Stubbs: Will you keep a girl company?
Ellsworth: I will, but I'm expensive.

It's hard to find good quotes to use from the show.  The writing is fantastic, kind of Shakesperian in it's delivery, but hard to understand out of context.

As an added bonus I thought I’d make some gloves too.  I didn’t have a pattern for any of these items, so it was all done freehand, but I think they turned out pretty well.


Top Hat Tutorial:

What you will need…
- 2-3 pieces of plastic canvas (the stuff used for cross stich)
- Strong thread
- ½-1 yard of fabric approx. (for hat itself)- I used scraps I had around
- 1-2 yards of sheer fabric- I used scraps I had around
- Brooch

Cut the canvas into the pieces for your hat.  These include: a long piece about 6-8 inches tall and wide enough to go around your head; a small circle that will fit in the top, and a large circle for the brim.  You can easily cut out the small circle from the middle of the large one and it will be the perfect size.

Then you will sew together your canvas pieces with the strong thread.  You will want strong thread so that you hat stays together.  To make mine, I used a double strand of thread.  Once your hat is together you will add the fabric to it.  I unfortunately forgot to take a photo at this point to show you what it looks like.  But it will look like a plastic canvas top hat.

Next, cut your fabric for the hat into pieces to cover the canvas.  The circle on top needs to be larger than your canvas.  And don’t forget that the brim needs to be covered on both sides (top and bottom). 

Sew the top circle to the canvas by sewing through the holes on the side.  Try to keep the top as flat as possible.

Sew the sides on.  I did this by turning about ¼ of an inch under and slipstitching it to the hat at the top.  You can also sew the bottom, but it not necessary as fabric will be covering it.

Then you sew the brim on.  Take your two pieces (two since you need a top and bottom), and sew them together on your machine.  Turn it inside out.  Slip over the hat.  You will most likely need to bend the hat a bit to get it on.  Try not to break any stitching, particularly the stitching holding the canvas hat together.  If the brim will not lay flat within the fabric, don’t worry.  Mine didn’t since I didn’t cut them in perfect circles.  This just makes the brim bend a bit and I think it looks cooler.

Next, sew the fabric underneath to the hat.  You will need to cut the fabric so it lays flat on the inside. 

Now the main part of the hat is done.  Next you will use the sheer fabric.  You can cut it in ½ long ways so it isn’t such a wide piece.  If you want to you can hem the edges so they don’t fray, but I liked the frayed look so I left mine bare.  Wrap it around the base of the hat and tie it in a knot in the back.  Sew around the edges, hiding your stitches so the knot stays in place. 

Add a brooch to the front of the hat.

Stand back and admire your work!!!