Showing posts with label Sew Weekly. Show all posts

June 12, 2012

SW: On the Television


Who else out there watches Happy Endings?  I'm kind of in love with it.  

Reasons to watch Happy Endings... 
1. It's hilarious... that's a given.
2. It's set in Chicago!  Their Chicago doesn't make much sense, but it is here nonetheless.
3. They throw a 1920's housewarming party.  I want to go to a 1920's themed housewarming party!

  
This week's Sew Weekly challenge was to find inspiration from a TV show.  I thought about going my usual route and make something from a period costume show, but I'm in need of separates!  And I love the fashion of Jane Kerkovich-Williams on Happy Endings.  It all works out! You can check out the page here.


Also, deep down, I am just as much of a type A personality that Jane is... I just don't let it out to breathe like she does. 

This is what I used for inspiration for the challenge.


I've never liked wearing shorts or shorter skirts, but I decided to branch out and make something out of my usual comfort zone.  I've worn the skirt once and felt pretty strange in it, but the top will probably get lots of rotation in my wardrobe!


 And everything was made out of hand-me-downs from my husband's wardrobe!  The shirt is an old dress shirt and the skirt is made from a pair of khakis.


Maybe I should have used this outfit as inspiration... 


April 16, 2012

March 22, 2012

Sew Weekly... MAD MEN!!!

I'm sure I don't have to tell anyone how excited I am for Mad Men coming back in a few days.  It's my favorite drama on TV today and it will be back so soon!!!!!

This week's challenge on Sew Weekly was a Mad Men challenge!  Go check it out on over at Sew Weekly!

January 16, 2012

SW Challenge- Buttonholes

This year I am going to try to sew as much as possible along with the Sew Weekly challenges.  This week’s challenge is to use buttonholes in your project.  I ended up having two projects this week that used buttonholes, but here is the one for me. 

I got a bunch of this plaid fabric from Meg and wasn’t sure what I was going to do with it.  I had separately wanted to make a circle skirt since I hadn’t made one in years.  Then it hit me!  I have a bunch of plaid fabric that I could make a big comfy skirt with!

I didn’t measure how much fabric I had originally, but I drafted up a pattern for a circle skirt with 8 panels.  The fabric was 22 inches wide so I had to make thinner panels instead of a couple big ones.  I lined it with its own fabric also.  To close it, I used some leather buttons I had sitting around.  So no zipper!  And buttonholes are really easy on my machine.  All you have to do is set it up and it does it all automatically. 


We went into the park to take some photos on the last nice day before we got a bunch of snow.  PS- I’m really excited for all this snow!  Chicago usually just gets dusts that don’t last more than a day.  But this one is sticking around!  Zoey and I got to play in the snow a bunch too!


You can check out my post over at Sew Weekly here!

And coming up soon is Zoey's new crate covering that has 36 buttonholes... I don't think I've ever had to make that many buttonholes!

December 15, 2011

SW- Going Patternless

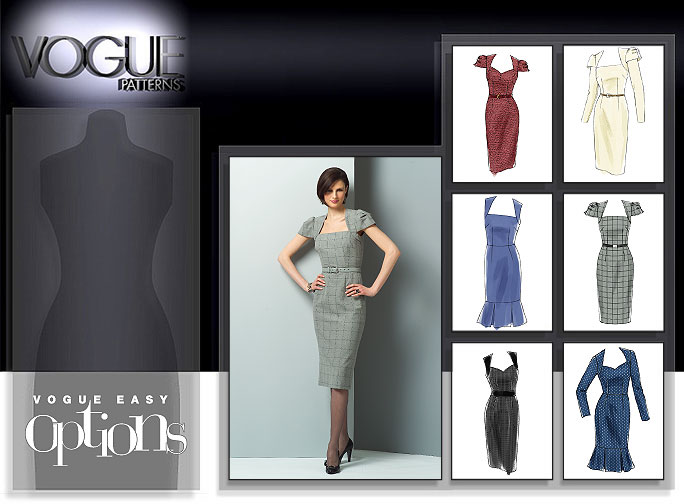
This week's challenge on Sew Weekly is to create something without a pattern.  I had been wanting to make a holiday dress also, so I just sort of combined the two!  I was originally going to use a pattern I had gotten from Meg, the Vogue 8280.


I was going to make the black dress that is in the bottom corner.  I didn't like the back of the dress... it was too boring for a cocktail dress.  You can't see it on these photos, but it was just a full back with no special detail work.  Also, when I was looking at the pattern I had, it was the wrong size.  So I didn't completely go patternless as I used the top front piece... but I did the rest free hand and had to make lots of changes to that small piece too.

Oh, and Zoey tried to help me yet again... I don't know why she does stuff like this, but it leads to very cute photos.


I started by designing what I wanted the back to look like.  I copied the shoulders from the front and then pleated the lower back.


I had to redo all of the pleats, including the chest ones because they were placed oddly... or maybe I just have an odd body... I dunno.  The top looks kind of goofy in this picture because my dress form is really flat chested.


Sorry all the photos are dark... I leave for work with the sun rising and get home as it sets... so we are lit by Christmas lights!


And tomorrow night my husband is taking me out so hopefully I can get a photo to put up of me in the dress!

August 1, 2011

Sewing Challege: Western

At first when I heard the theme was Western, I was at a loss.  My fiancé loves westerns, but I don’t nearly love them as much.  Then I realized one of my favorite shows was a Western! 

This is for my fiancé .  He goes crazy when he just rides one of the buses with ads on them for Montana...


Deadwood, for those who haven’t seen it, was a tv show on HBO from 2004-2006.  It was set in the 1870s in Deadwood, South Dakota.  The show had lots of fantastic actors, an amazing script and set, and really good looking costumes.  The show combined true characters and events with fictional elements.  Though using the female characters for inspiration limited me to prostitutes, drunks, and one widow. 


Wild Bill Hickok: You know the sound of thunder, Mrs. Garret?
Alma Garret: Of course.
Wild Bill Hickok: Can you imagine that sound if I asked you to?
Alma Garret: Yes, I can, Mr. Hickok.
Wild Bill Hickok: Your husband and me had this talk, and I told him to head home to avoid a dark result. But I didn't say it in thunder. Ma'am, listen to the thunder.

While I love Trixie, I didn’t want to have to go out and buy a bunch of supplies to make a corset… though I could have made some fantastic striped stockings…


I thought it would be fun to branch out from my usual sewing and try my hand at a hat.  I don’t really have much use for a hat, but I’ve always loved the hats that Joanie wears.  After looking at some photos, I guess it's just one hat, but it's so much fun.


Joanie Stubbs: Will you keep a girl company?
Ellsworth: I will, but I'm expensive.

It's hard to find good quotes to use from the show.  The writing is fantastic, kind of Shakesperian in it's delivery, but hard to understand out of context.

As an added bonus I thought I’d make some gloves too.  I didn’t have a pattern for any of these items, so it was all done freehand, but I think they turned out pretty well.


Top Hat Tutorial:

What you will need…
- 2-3 pieces of plastic canvas (the stuff used for cross stich)
- Strong thread
- ½-1 yard of fabric approx. (for hat itself)- I used scraps I had around
- 1-2 yards of sheer fabric- I used scraps I had around
- Brooch

Cut the canvas into the pieces for your hat.  These include: a long piece about 6-8 inches tall and wide enough to go around your head; a small circle that will fit in the top, and a large circle for the brim.  You can easily cut out the small circle from the middle of the large one and it will be the perfect size.

Then you will sew together your canvas pieces with the strong thread.  You will want strong thread so that you hat stays together.  To make mine, I used a double strand of thread.  Once your hat is together you will add the fabric to it.  I unfortunately forgot to take a photo at this point to show you what it looks like.  But it will look like a plastic canvas top hat.

Next, cut your fabric for the hat into pieces to cover the canvas.  The circle on top needs to be larger than your canvas.  And don’t forget that the brim needs to be covered on both sides (top and bottom). 

Sew the top circle to the canvas by sewing through the holes on the side.  Try to keep the top as flat as possible.

Sew the sides on.  I did this by turning about ¼ of an inch under and slipstitching it to the hat at the top.  You can also sew the bottom, but it not necessary as fabric will be covering it.

Then you sew the brim on.  Take your two pieces (two since you need a top and bottom), and sew them together on your machine.  Turn it inside out.  Slip over the hat.  You will most likely need to bend the hat a bit to get it on.  Try not to break any stitching, particularly the stitching holding the canvas hat together.  If the brim will not lay flat within the fabric, don’t worry.  Mine didn’t since I didn’t cut them in perfect circles.  This just makes the brim bend a bit and I think it looks cooler.

Next, sew the fabric underneath to the hat.  You will need to cut the fabric so it lays flat on the inside. 

Now the main part of the hat is done.  Next you will use the sheer fabric.  You can cut it in ½ long ways so it isn’t such a wide piece.  If you want to you can hem the edges so they don’t fray, but I liked the frayed look so I left mine bare.  Wrap it around the base of the hat and tie it in a knot in the back.  Sew around the edges, hiding your stitches so the knot stays in place. 

Add a brooch to the front of the hat.

Stand back and admire your work!!!


July 27, 2011

Sewing Challenge: Nautical Theme


This week’s sewing theme is Nautical.  I’m not big on Nautical designs, but I’ve missed the past few weeks since I’ve been so busy so I thought I’d try my hand at a modified nautical look.

I took inspiration from the big nautical collars and striping.  Instead of using blue stripes, I went for red.  And instead of the usual large collars, I picked a pattern that had a unique collar to it.

I’ve had this red striped fabric around for years, but hadn’t done anything with it since it is all slippery.  (Not that fabric above, that's just an example of red and blue nautical fabric.)  Sewing slippery fabric is one of the most annoying things to me.  Actually it might be the most annoying for me. 

I bought this retro pattern earlier this year because I fell in love with the great lines of it.  I knew I was never going to make it floor length, but I thought it would do pretty well as a knee length dress too.

I can usually whip up a dress in one night without too much trouble.  This one is definitely a two day project.  The top alone has 8 pieces of fabric and 8 pieces of lining, with numerous sections that needed to be gathered.  The skirt was an additional 4 pieces and if I had decided to line it too then it would have been 4 more. 

I laid out the fabric and made sure that Zoey was comfortably asleep on the couch so she wouldn’t try to walk all over it.  Usually when I’m cutting I don’t use pins to save time, but in this case I wasn’t going to take any chances. 

After cutting it, I had to sew around all of the edges so it wouldn’t fray.  I hate doing this too since it takes so long.  Silky fabric all around sucks…

Once all the prep work was done, I could get started on the actual construction.  This took most of the night since there was such small detail work and it’s not easy to iron silky materials.  But by the end of the night I had it all put together.  Thought the directions it came with was missing important pieces.  I could figure out what I needed to do, but it was still annoying.

My second day of work was mostly to do the fitting of the dress.  I had to take out the hips, take in the waist, sew up the front, and hem. 

Here’s the final dress.  The hardest part of wearing this is going to be keeping the seam straight on the front!  It keeps shifting as I move.


What is your least favorite type of fabric to work with? 

July 5, 2011

American Apparel Challenge

I have a friend who does sewing challenges from Sew Weekly, so I decided I’d try my hand at one.  The one that was up for this week was paying “tribute to designers that call America home.”  I don’t follow designers at all… unless you consider watching Project Runway following…

One designer I can point out their designs though is Diane von Fürstenberg.  The staple of her designs are wrap dresses and prints. 

I had bought this green fabric about a month ago and knew that I wanted to use one of my dress patterns for it.  I have a pattern that is perfect for strech fabric and I’ve made it before with ¾ length sleeves, but I wanted something that was more summery for this fabric. 


The dresses I had made in the past are these two.


I took off the sleeves and reversed the direction of the darts; otherwise it mostly follows the pattern.  The dress isn’t a wrap dress, but the ruching and overlapping v-neck give it the same feel.  I like to not have to worry about whether my dress will stay together or not…

It took about 3 episodes of Mad Men to go from a pile of fabric to a fitted and hemmed dress.

And here’s my end product.  It looks much better on, since my dress form is sort of strange.  But I didn’t have anyone around to take a photo of me so this is all I have! 


I’m thinking of wearing it to my upcoming bridal shower in a few weeks!